lunes, 20 de febrero de 2017

maintenance workshop

Types of Computer Maintenance 
When I speak of Maintenance to a Computer, I mean the measures and actions that are taken to keep a PC running properly, without it crashing or emitting error messages frequently. There are two types of maintenance that can be applied to a computer:
 Corrective maintenance:
This maintenance is also called "reactive maintenance", it takes place after a fault or fault occurs, that is, it will only act when an error occurs in the system. In this case, if there is no fault, the maintenance will be null, so it will have to wait until the fault is present to take corrective measures.

Consequences:
 -Paras not provided for in the production process, decreasing operating hours. -Affects the productive chains, that is, that the subsequent productive cycles will be stopped waiting for the correction of the previous stage.
 -Provides repair costs and spare parts not budgeted, so it will be the case that due to lack of financial resources can not buy the parts at the desired time 
 -The planning of the time that the system will be out of operation is not predictable. 

Preventive Maintenance:
This maintenance is also called "planned maintenance", it takes place before a fault or fault occurs, it is advisable to do it every 3 months, it is carried out under controlled conditions without the existence of any errors in the system. It is carried out based on the experience and expertise of the personnel in charge, who are in charge of determining the necessary time to carry out said procedure; The manufacturer can also stipulate the right time through the technical manuals.

Characteristics: 
-It is done at a time when it is not being produced, so it takes advantage of the idle hours of the plant. - Following is a pre-elaborated program which details the procedure to be followed, and the activities to be carried out, in order to have the necessary tools and spare parts "on hand". 
 -It has a scheduled date, plus a start and end time set and approved by the company directive. -It is intended for a particular area and certain equipment specifically. Although it is also possible to carry out a general maintenance of all the components of the plant.
 -Allows the company to have a history of all the equipment, also provides the possibility to update the technical information of the equipment.
- Allows for a budget approved by the directive.

Steps to carry out preventative maintenance:
 1. Disconnect the external cables. The power input cable must be disconnected from the PC source. All devices connected to the equipment must be switched off. Cables from the peripherals to the PC must also be disconnected. PC manipulation for both preventive maintenance or repair should be done as far as possible with insulation shoes or antistatic wristbands. It is not necessary to overtighten the connectors of the peripheral cables that are coupled from the back to the PC when they reconnect, as this leads to the detachment of the screws of the PC connectors.
2. Indoor PC cleaning. To remove the dust we recommend using a blowing device that is capable of releasing a jet of air. If you use a vacuum cleaner you have to use a brush or brush to help in the removal of lumps (combination of dust and grease or dust and moisture) taking care in the movement of them to avoid damaging components or loosening cables. With the blower it injects air for ALL THE SECTORS. The computer's power source retains as much dust as it needs to be blown through its grilles and through the air exhaust cavity. Open the floppy window and bring air in there.
Check the PC's internal connectors (points where cables are plugged in) to make sure they are not loose. The same procedure applies to RAM boards and modules (bad contacts can cause PC LOCK and RESET).

3. Cleaning the monitor. You can inject air through your grates without opening it, because the residual energy that keeps after shutting down makes it dangerous. This should be uncovered only in case of repair.

4. Cleaning the keyboard. Turn it upside down and inhale air between your keys to remove dust and foreign bodies. It is not necessary to remove the covers of the keys of the PC to wash them, their replacement generates enough mechanical faults (they can be cleaned between passing them a handkerchief moistened with liquid soap).

5. Maintenance of printers. They have different treatments according to their technology. Dot matrix systems require more attention (due to their higher percentage of mechanical work generating friction, heat and dust). These have to be uncovered to blow inside because they collect enough dust and paper particles. Then clean the vane or shaft where the print head slides to remove old grease. Lubricates the shaft with coarse oil, such as that used in automobile engines. The printhead can be removed to place it face down with the needle tip submerged in isopropyl alcohol in order to dissolve the compacted ink. The nozzle should be lubricated underneath to minimize friction of the needles in that area.

6. Mouse maintenance. Open the bottom cover of the mouse and examine the axes that come in contact with the sphere. If they are dirty (usually with a ring of dust and grease particles) clean them with a tissue (or cloth that does not release lint) moistened with alcohol or liquid soap.

7. Cleaning the floppy drive. To clean the heads of the FLOPPY, use a floppy cleaning disk. If you suspect that a foreign body has remained inside (such as a sticker, clip, clip or spring on a floppy disk) you have to open it to extract the foreign body. If it is a Floppy that works in a dusty environment (for example the floor), you have to open it to clean it and LUBRICATE it.

8. Maintenance of optical drive CD-ROM, CD-RW, DVD. Normally it should not be opened except in the cases that we will mention later. The tray should be wiped with a damp cloth to remove dust and dirt to reduce particle flotation when reading or writing to a CD. If the working environment is dusty (or the unit has not been serviced for a long time), it must be opened to CLEAN it and LUBRICATE it. Cleaning consists of: CLEANING the LASER lens carefully (note that it is supported by a very delicate FLOATING STAND). It can be cleaned with a medicinal stick with cotton on the tip moistened with alcohol. This operation is delicate and should not be done if you do not have a firm pulse as an undue force on the lens can damage it. The rails through which the tray slides should be lubricated as well as the plastic sprockets that are visible.

9. Cleaning the outer surface of the PC and peripherals. It is recommended to use a cloth moistened with liquid soap (since computer equipment is usually littered with dust from the environment and contact with operators' hands). Solvents or alcohol are not recommended for cleaning decks, enclosures or PC enclosures and peripherals due to their abrasive action and solvent.

10. Programs (Software). Considering the devastating action of malicious codes (viruses, spyware, advertising, pornography, etc.) it is necessary to periodically check the hard drive with anti virus and anti spyware tools. It is also important to install a firewall to prevent attack by intruders through the open ports on the PC. These tools can be found on our Utilities page.

What is preventative maintenance
Preventive maintenance is one that is performed in advance to prevent the occurrence of breakdowns in appliances, electronic equipment, automotive vehicles, heavy machinery, and so on.

Some actions of preventive maintenance are: adjustments, cleaning, analysis, lubrication, calibration, repair, changes of pieces, among others. In the area of ​​computer science, preventive maintenance consists of the software and hardware revision of the PC or computer, which allows the user to have a reliable equipment to exchange information at a maximum speed with respect to the system configuration.


How this maintenance can be done

In maintenance operations, preventive maintenance is intended for the preservation of equipment or installations by performing a review and repair to ensure its good operation and reliability. Preventive maintenance is performed on equipment under operating conditions, as opposed to corrective maintenance that repairs or puts into operation those that have ceased to function or are damaged.

The first objective of the maintenance is to avoid or mitigate the consequences of the failures of the equipment, managing to prevent the incidents before they occur. Preventive maintenance tasks may include actions such as changing worn parts, changing oils and lubricants, etc. Preventive maintenance should avoid equipment failures before they occur.


martes, 7 de febrero de 2017

SISTEMAS OPERATIVOS


  • CÓMO INSTALAR WINDOWS 10 PASO A PASO

Lo primero que debemos avisar es que tenemos que ser pacientes pues la actualización nos ha tardado algo más de dos horas desde que la comenzamos hasta que por fin hemos tenido instalado Windows 10 en nuestro ordenador, sobre todo se paciente y no desesperes. El primer paso que deberemos hacer es apuntarnos en una lista de espera para que la actualización llegue a nuestro ordenador, nosotros tal como nos hemos apuntado hoy hemos comenzado a recibir automáticamente la descarga.


Imagen 1

Una vez se esta descargando el archivo que tiene unos 3 GB de peso, el tiempo de descarga dependerá de la conexión de cada uno, podremos tenerla en segundo plano o sacarlo a primer plano.


Imagen 2

Imagen 3

Una vez terminada la descarga nos aparecerá una pantalla emergente solicitándonos permiso para comenzar la instalación.

Imagen 4

Ahora pulsaremos aceptar y la instalación comenzará a prepararse.

Imagen 5

Cuando esta preparación termine una nueva pantalla aparecerá y nos pedirá permiso para iniciar la actualización, en la siguiente pantalla deberás pulsar el botón iniciar la actualización ahora.

Imagen 6

Ahora comenzará la preparación para instalar la nueva versión de Windows.

Imagen 7

Imagen 8

Cuando se haya completado este proceso el ordenador se reiniciará y nos saldrá por primera vez el logo del nuevo Windows 10 e inmediatamente después comienza la instalación definitiva de Windows 10 en nuestro ordenador, durante este último proceso hay tres reinicios, uno cuando el proceso ronda el 30%, otro cuando está llegando al 75% y el último que ya nos dejará completamente operativo el ordenador con Windows 10 instalado.

Imagen 9

Imagen 10

Imagen 11

Imagen 12

Cuando este último reinicio haya terminado ya sólo nos queda configurar a nuestro gusto el nuevo Windows 10, os dejamos las últimas pantallas que irán apareciendo hasta que Windows 10 este totalmente operativo y listo para usarse.

Imagen 13

Imagen 14

Imagen 15

Imagen 16

Imagen 17

Imagen 18


  • Instalación del Sistema Operativo Linux


Paso 2: Instalación del Sistema Operativo Linux.
  • Accedemos a la página de descarga de Ubuntu pulsando aquí y seleccionamos el sistema de 64 bits y a continuación pulsamos sobre “Start Download”. Acto seguido, se empezará a bajar a nuestro equipo una imagen ISO con Ubuntu Linux.
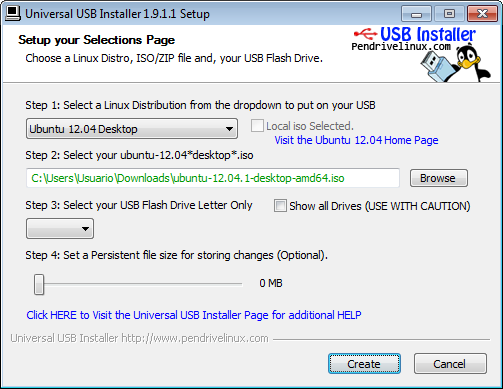
  • Una vez descargado el archivo ISO, tenemos dos opciones: grabarlo e instalarlo desde un CD/DVD o hacerlo de un pendrive de por lo menos 2GB, por lo que necesitaremos un software que se ejecuta desde Windows y se llama Universal USB Installer que podemos descargar desde aquí. En esta guia explicaremos el procedimiento para la instalacion a través de una memoria USB.
  •  Ejecutamos la aplicacion Universal USB Installer y seleccionamos en el Paso 1 la distribucion Ubuntu 12.04 Desktop, en el Paso 2 elegimos la ubicación del archivo ISO que nos hemos bajado anteriormente y en el Paso 3 seleccionamos la letra de la unidad USB (IMPORTANTE: ¡¡SE BORRARÁN TODOS LOS DATOS!!) y pinchamos en “Create”:

Universal USB


  • Una vez finalizado el proceso, extraemos de forma segura la unidad USB y apagamos el portátil. 
  • Conectamos la unidad USB al portátil de préstamo y lo encendemos. 
  • En cuanto aparezca el logotipo de Acer pulsamos F12 y cuando aparezca el menú de arranque elegimos la unidad USB. 
  • La instalación de Linux comenzara automáticamente. 
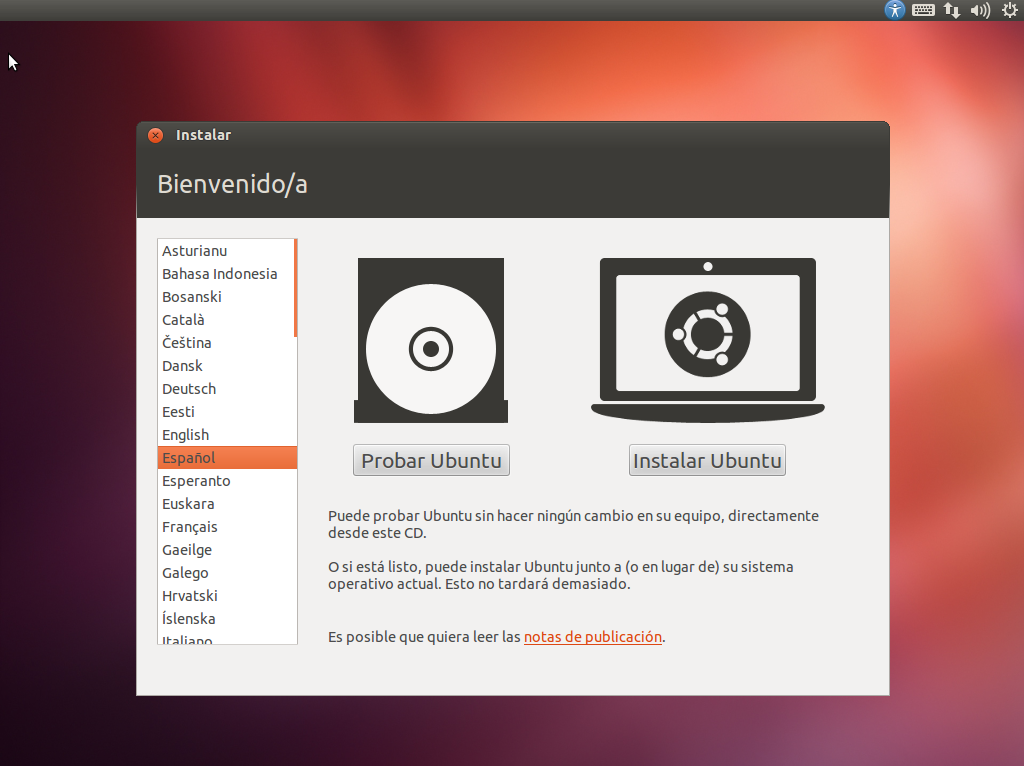
  • A continuación, seleccionamos el idioma Español o en su defecto, el que prefiramos para el sistema operativo y pulsamos sobre “Instalar”.
Linux1

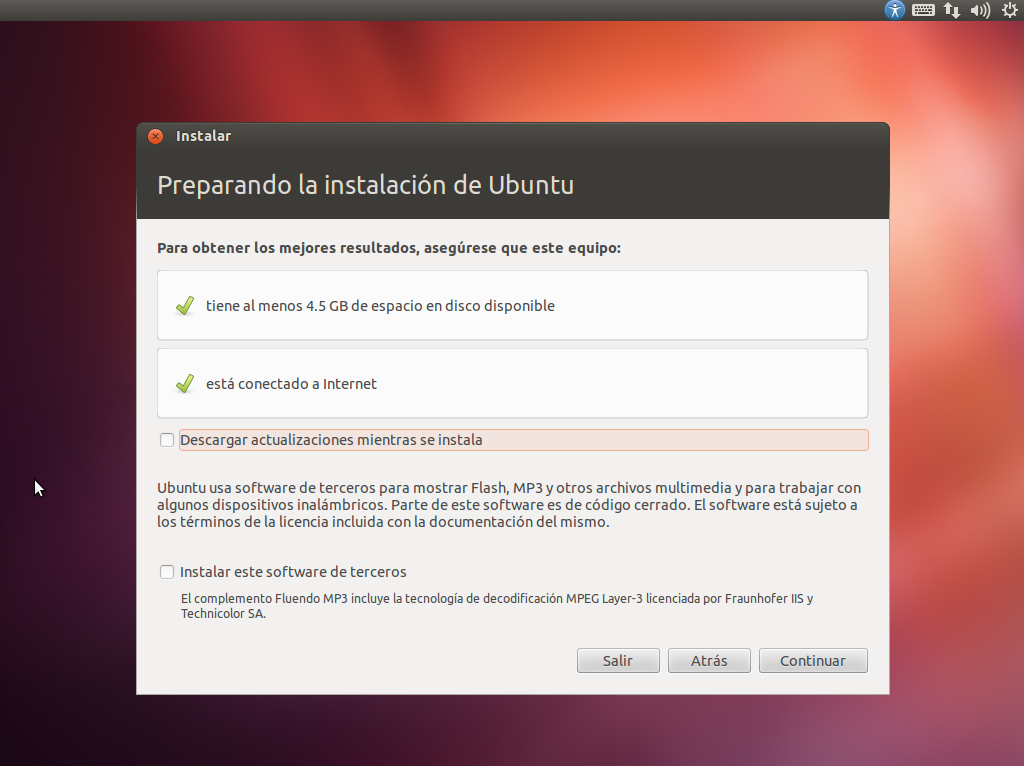
  • Durante la instalación, es posible que tengamos la opción de tener el portátil conectado a Internet para que se baje los paquetes mas actualizados. Si tenemos esta posibilidad, Ubuntu lo detectará automáticamente y tendremos la opción de pulsar sobre “Descargar actualizaciones mientras se instala”. Tambien podemos instalar software de terceros (por ejemplo, para reproducir archivos de sonido MP3) pero esta opción ya queda a la elección del usuario, que dependiendo de su filosofia, elegirá una opción u otra. Despues de elegir las opciones que mas nos interesen, pulsamos sobre “Continuar”.
Linux2
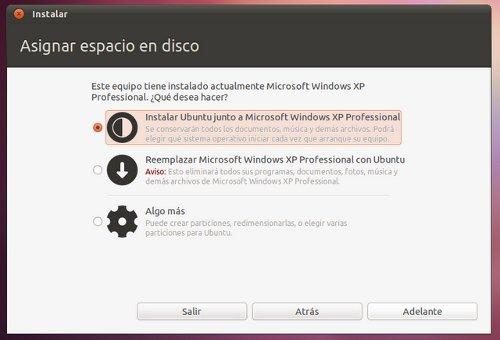
  • Como supuestamente hemos instalado Windows antes de instalar Linux, deberiamos tener un espacio sin particionar, por lo que elegiremos la opción de “Instalar Ubuntu junto a Microsoft Windows”. El resto de opciones son para usuarios avanzados. Una vez seleccionada la opción deseada, pulsamos sobre “Continuar”.
  • A continuación, se pondrá a instalar la distribución de Linux, y mientras instala nos va a pedir que introduzcamos nuestra ciudad (Madrid), y datos como nuestro nombre, nombre de equipo, contraseña, etc… que iremos rellenando segun nos lo vaya pidiendo.
Linux4
  • Una vez finalizado todos estos pasos ya tenemos instalado Ubuntu instalado junto a Windows y en el siguiente arranque, antes de iniciar cualquier sistema operativo, nos saldrá un menú para que seleccionemos el sistema operativo con el que queremos arrancar el portatil.